Archived board. This is a read-only archive of the Fast Tracks forums, active 2004–2016. Posting closed in May 2016; the board was preserved as a static site in 2026. Some images were lost before archiving and are marked where they appeared.

Fast Tracks

Model Railroading Discussion Forums

Return To The Fast Tracks Website

The Fast Tracks discussion forums have been closed. Click Here for more information.

It is currently Thu Aug 06, 2026 12:00 am

All times are UTC - 5 hours [ DST ]


Forum locked This topic is locked, you cannot edit posts or make further replies.  [ 12 posts ] 
Author Message
PostPosted: Sun May 09, 2004 6:44 pm 
Offline
Site Admin

Joined: Fri May 07, 2004 11:22 pm
Posts: 311
Location: Port Dover, Ontario
Get To the Point!

By Tim Warris (This newsletter was originally published on October 12, 2003)

Whether you use Fast Tracks Assembly Fixtures, or build your turnouts completely by hand, making a good looking and reliable switchpoint is a must. And it is not nearly as hard as it would seem, it just takes a little practice and patience.

There are lots of ways of making a point for a turnout, and the method that I will describe here is by no means the only way to do it; it?s just a way that seems to work best for me and might work well for you too.


The Perfect Point

The ideal point will have an angle that nicely blends with the stock rail, showing no gaps along the contact area. Achieving this level of precision simply takes practice.

📷 Image no longer available
Originally hosted at www.handlaidtrack.com — the host went away before this archive was made.


I've seen many turnouts with what I would call "ugly" points. Sure they will work well enough, but they just don't look very nice.


The Jaws Of Vice

The most important tool in producing a good switchpoint with ease and minimal frustration is a good solid vice with proper jaws for holding the rail.

The jaws must be smooth on the top and inside surfaces and must close tightly without any gaps between the jaws.

📷 Image no longer available
Originally hosted at www.handlaidtrack.com — the host went away before this archive was made.
)

They should be made of soft steel, as hard steel jaws will ruin your file very quickly.

If the jaws of your vice are not smooth, file them as smooth and square as possible so that you are able to firmly hold the base of the rail with no gaps. This is so important that I have even gone so far as to make special tapered jaws to fit my vice, grinding them perfectly flat with a surface grinder so that the top edge closes tight leaving clearance at the bottom. (Being a machinist does have its advantages!)


Sanding vs. Filing

While I am a big fan of using a bench top sander for track work, I don't use it for making switchpoints. Power sanders will quickly overheat and discolor the thin end of the point, plus it is very difficult to evenly hold the point against the sanding belt resulting in an odd looking taper.

For this reason I prefer to file points using a hand file, working slowly and methodically to get the point to fit just right.

Use a good file! This is no job for a dull, wimpy under sized file. Get yourself a nice, new, sharp, flat file that is at least 10" long with a good feeling handle. To learn more about selecting and using files, check out my newsletter titled The Care & Feeding Of Files.


Making Your Point

Begin by marking the end of the taper on the point with a scribe or fine tipped marker. To make this easy, download and use the appropriate Fast Tracks tie template from our template library.

Clamp the base of the rail into the vice with the side that you have marked facing up. The end of the point should be aligned with the edge of the vice as shown here.
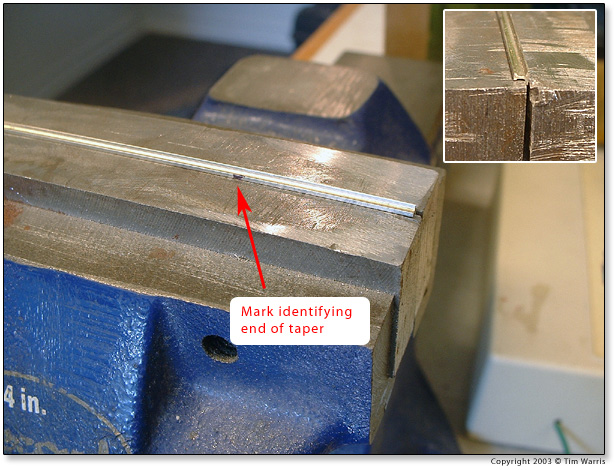
Image

File the point using long, slow, even strokes filing toward the tapered end of the point being sure to lift the file on the backstroke. (Files only cut on the forward stroke!)

Try to remove more material from the base side of the point. This way the point will fit flush to the head of the rail with a slight clearance at the base. Without this extra clearance at the base of the rail you will have an unsightly gap at the head of the rail.

When you are finished the point should have a nice even taper from your mark to the end of the point. Do not remove too much material so as to break through the web of the rail. Ideally you should file to half the width of the web. (Photo 4) Keep the taper short. (Note, because I am left handed I clamp the rail into the right side of the vice. If you are right handed, you might find it easier to clamp the rail on the left side.)

Remove the point from the vice and "debur" the bottom of the rail so it is smooth to the touch. To achieve a smooth point, a bit of the head of the rail on the opposite side that you just filed needs to be removed by "blending" it in.

📷 Image no longer available
Originally hosted at www.handlaidtrack.com — the host went away before this archive was made.


This can also be done after the point is installed.

If the point does not fit nicely against the stock rail, resist the urge to bend it a bit to make the gaps disappear! Doing this usually throws the point out of gauge. Instead throw the point away and try again.

Prior to using assembly fixtures to assemble my turnouts I would usually have a lot of trouble keeping the gauge right through the points, with most ending up being to narrow. Using a Fast Tracks Assembly Fixture completely eliminates this problem.


Fit & Finish

Finally, after I have installed the points by soldering them to the throwbar or hinging, I like to use a thin, flexible file to file the inside of the rail (on the gauge side) at the end of the point to "blend" it nicely into the stock rail, eliminating any possibility of equipment picking up the point.

📷 Image no longer available
Originally hosted at www.handlaidtrack.com — the host went away before this archive was made.


See, nothing to it! Your first few attempts at point making will probably be a bit rough. But keep at it, and before long you will be making perfect points in just a few minutes.

- Tim

----------------------------------------
Have a question or comment about this issue of the Fast Tracks newsletter? Then post a reply! I will be happy to respond to any posts. - Tim


Top
 Profile  
 
 Post subject: material for vise jaws
PostPosted: Tue May 11, 2004 8:00 am 
Offline

Joined: Mon May 10, 2004 11:33 pm
Posts: 5
Tim,

As usual, your information is tremendous and your assistance is deeply appreciated. Thanks a bunch for this forum. In looking at your article about getting the point, you mention vise jaws of soft steel. I have a vise, grinder and drill press, so I can easily make jaw inserts for my vise. However, I am not a machinist and know very little about metal. You mention soft steel, but exactly what do I need to ask for when I go to purchase material to make these jaw inserts for my vise and where can I purchase it??

Thanks again for your high quality product and assistance and this forum.

Mark Hagy


Top
 Profile  
 
 Post subject:
PostPosted: Tue May 11, 2004 9:18 am 
Offline
Site Admin

Joined: Fri May 07, 2004 11:22 pm
Posts: 311
Location: Port Dover, Ontario
(!empty($user->lang['QUOTE'])) ? $user->lang['QUOTE'] : ucwords(strtolower(str_replace('_', ' ', 'QUOTE'))):
However, I am not a machinist and know very little about metal. You mention soft steel, but exactly what do I need to ask for when I go to purchase material to make these jaw inserts for my vise and where can I purchase it?


Hi Mark,

Glad to hear you are enjoying our new forums! Yours is the first post, so a trailblazer indeed! 8)

Being a tool and die maker I sometimes forget how easy it is for me to find materials and work with them, modifying a vise to clamp onto the base of rail is a simple process in a full machine shop. I intend on releasing a newsletter on the process of modifying the vise with these type of jaws in the future if there is enough interest in it. The premise of the modification is to fabricate jaws that are tapered, and only close at the very top edge, thus enabling you to firmly clamp onto the base of the rail, this makes filing points much easier, and the steel being soft it will not damage your files.

The material I use for this is simple "cold rolled steel", or "mild steel", which is fairly easy to come by at any metal supply shop. Most cities have one, here in Canada there is a chain called "Metal Supermarket" which caters to retail sales of small pieces of metal of all sorts.

Against my better judgment I am going to mention a product I am working on and hope to be adding to the line soon, I say against my better judgment because I have mentioned it before and there is allot of interest for it, and unfortunately I just have not been able to get it produced with all the other demands on my time, but I do believe I will be releasing it this summer.

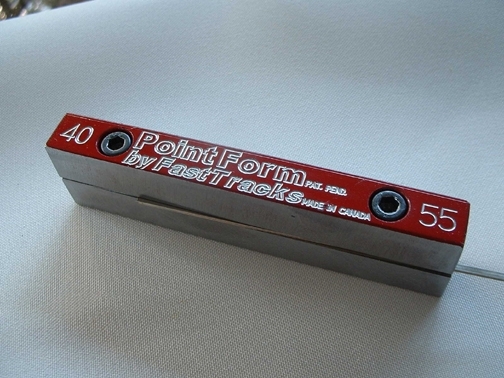
It is a tool I call the "Point Form", which works similar to the Frog Point grinding jig but is a little more sophisticated in that it clamps onto the rail similar to a vise. This tool allows someone with little practice to quickly and easily form accurate switch points. The prototype I have made works great, and I have been using it for a while now and believe anyone using it will no longer need to develop the skills needed with a vise and a file to form nice looking and smooth running points.

When the is ready to add to the line there will be a post about it in the Announcements forum.

Hope this helps!

_________________
Cheers!

Tim Warris
Fast Tracks
http://www.fast-tracks.net
service@fast-tracks.net


Top
 Profile  
 
 Post subject:
PostPosted: Tue May 11, 2004 7:47 pm 
Offline

Joined: Mon May 10, 2004 11:33 pm
Posts: 5
Tim,

That helps a whole bunch. When you get that "Point Form" ready to go, let us know. Thanks again for your assistance.

Mark Hagy


Top
 Profile  
 
 Post subject:
PostPosted: Wed May 12, 2004 3:33 am 
Offline

Joined: Wed May 12, 2004 3:26 am
Posts: 10
Location: Riverstone, NSW, AUSTRALIA
Hi Tim

Great to see another forum on model RR and especially one for hand layed track/turnouts.

I have recently embarked on the handlaying track and find the most frustrating parts are the frog point and the switch points of turnouts. For the frog I am currently using the bend-file-fold method which is OK but not the best. A frog filing jig will be on my buying list soon. The points are my biggest headache and it usually takes me about 3 or 4 goes to get anything reasonable. A jig to accomplish switch point like yours would definately be a welcome addition to my toolbox.

I am currently doing everything without a jig as the costs in $A is a little too much, but I could see that one would be helpful. Anyway, keep up the great work.

Cheers
Bruce


Top
 Profile  
 
 Post subject:
PostPosted: Thu Jun 24, 2004 5:25 pm 
Offline

Joined: Thu May 13, 2004 2:01 am
Posts: 41
In refering to this line can you explain a bit more about those vice jaws and how to get them tighly closed at the top. My vice jaws are 2.5" long by .75" deep, however, if all that needs to touch is the top portion what can I do to get a bet tighter fit? As it stand, when I enclose the base of the rail in the vice one of the jaws likes to raise up a little bit.

Donnell M. Wells

Tim Warris (!empty($user->lang['WROTE'])) ? $user->lang['WROTE'] : ucwords(strtolower(str_replace('_', ' ', 'WROTE'))):


...The premise of the modification is to fabricate jaws that are tapered, and only close at the very top edge, thus enabling you to firmly clamp onto the base of the rail, this makes filing points much easier, and the steel being soft it will not damage your files....


Hope this helps!

_________________
Romans 10:9-10


Top
 Profile  
 
 Post subject:
PostPosted: Thu Jun 24, 2004 7:05 pm 
Offline
Site Admin

Joined: Fri May 07, 2004 11:22 pm
Posts: 311
Location: Port Dover, Ontario
(!empty($user->lang['QUOTE'])) ? $user->lang['QUOTE'] : ucwords(strtolower(str_replace('_', ' ', 'QUOTE'))):
In referring to this line can you explain a bit more about those vice jaws and how to get them tightly closed at the top.


Accurately closing vise jaws, now thats a tough one. Unfortunately most vises available have fairly crudely formed jaws, and this is understandable considering what most of them are used for. For our purposes though, we need vise jaws that will close up fairly tightly at the top, ideally to grip only on the base of the rail. In the past I have taken pieces of rail with me when shopping for a vise, and tried various models until I could find one that I was satisfied with, they are out there. One advantage I have being a machinist is access to the materials and equipment to make the "ideal" set of jaws. I custom made mine to fit the 4" Record vise I had, these jaws are tapered inside to allow for ample clearance, this way the jaws only close up on the very top edge of the jaws, allowing me to easily grip onto the base of the rail. Plus, they are made from a soft, mild steel, this way they will not damage the file.

Of course, not everyone is a machinist. Next week we are going to launch a new product to the Fast Tracks line, a tool I call the "Point Form", which is a custom designed "clamp" to accurately hold the rail at the same angle as the Fast Tracks turnouts are designed to. Using a file or a bench top sander, very accurate points can be made in seconds.

I have been working on the design of this tool for some time, and I am now just finishing up the documentation for it. These will be available in two versions, one for code 40-55 (shown in the picture below) and one for Code 70-100


Attachments:
Point form.JPG
Point form.JPG [ 161.69 KiB | Viewed 29952 times ]

_________________
Cheers!

Tim Warris
Fast Tracks
http://www.fast-tracks.net
service@fast-tracks.net
Top
 Profile  
 
 Post subject: Get to the point!
PostPosted: Sun Jun 27, 2004 2:34 am 
Offline

Joined: Thu May 13, 2004 2:01 am
Posts: 41
Hello Tim and all,

I returned the vise that did not work and exchanged it for one that did and have been testing it by making various points. So far, I have been very successful, especially since I also purchased a new 10" mill file.

I am done for tonight, but I will try again tomorrow afternoon. If all is well, I can finally start the trackwork on my Free-moN module!

Donnell M. Wells
-sd80mac-

_________________
Romans 10:9-10


Top
 Profile  
 
 Post subject: Point jigs?
PostPosted: Sun Jun 27, 2004 4:05 am 
Hello Ron and Tim,
Please send me an email when the point jigs are available, I gather the code 40 55 can be used for N scale correcto??

Robert


Top
  
 
 Post subject:
PostPosted: Sun Jun 27, 2004 10:49 am 
Offline
Site Admin

Joined: Fri May 07, 2004 11:22 pm
Posts: 311
Location: Port Dover, Ontario
(!empty($user->lang['QUOTE'])) ? $user->lang['QUOTE'] : ucwords(strtolower(str_replace('_', ' ', 'QUOTE'))):
I returned the vise that did not work and exchanged it for one that did and have been testing it by making various points. So far, I have been very successful, especially since I also purchased a new 10" mill file


Good to hear you got one that will do the job! I'm not sure if I mentioned it in the newsletter, but a top rate quality file can not be overstated! A 10" mill file is exactly what you need. Take good care of it and it will last forever. A little blackboard chalk rubbed on the file before filing rail will keep the file from clogging up.

One thing to remember when filing points is to keep the angled section of the point fairly short, a switch point is not a long slim taper, it is fairly short. I can't give dimensions as each size is different, but one that has a taper over an inch long is unusual.

Hope this is helpful!

_________________
Cheers!

Tim Warris
Fast Tracks
http://www.fast-tracks.net
service@fast-tracks.net


Top
 Profile  
 
 Post subject:
PostPosted: Sun Jun 27, 2004 10:56 am 
Offline
Site Admin

Joined: Fri May 07, 2004 11:22 pm
Posts: 311
Location: Port Dover, Ontario
(!empty($user->lang['QUOTE'])) ? $user->lang['QUOTE'] : ucwords(strtolower(str_replace('_', ' ', 'QUOTE'))):
Please send me an email when the point jigs are available, I gather the code 40 55 can be used for N scale correcto??


There will be an announcement in the forums when these are available, which I am hoping will be this week, as soon as the documentation is complete. I hate writing documentation....

It will be worth the wait, they work great! There are two sizes available, one for code 40-55 and one for 70-83 and 100, any scale. As all the Fast Tracks turnouts are designed around the same angle on the switch points this tool will work for all our fixtures.

_________________
Cheers!

Tim Warris
Fast Tracks
http://www.fast-tracks.net
service@fast-tracks.net


Top
 Profile  
 
 Post subject:
PostPosted: Sun Jun 27, 2004 7:25 pm 
Tim Warris (!empty($user->lang['WROTE'])) ? $user->lang['WROTE'] : ucwords(strtolower(str_replace('_', ' ', 'WROTE'))):
Good to hear you got one that will do the job! I'm not sure if I mentioned it in the newsletter, but a top rate quality file can not be overstated! A 10" mill file is exactly what you need. Take good care of it and it will last forever. A little blackboard chalk rubbed on the file before filing rail will keep the file from clogging up.

One thing to remember when filing points is to keep the angled section of the point fairly short, a switch point is not a long slim taper, it is fairly short. I can't give dimensions as each size is different, but one that has a taper over an inch long is unusual.

Hope this is helpful!


Hi Tim,

Thanks for the advice about the chalk. I did not know this, but now can start using this information.

As for the switch point taper length, I wholy agree. Working for the UP, I see switch points daily. You definitely notice the short taper, even on mainline #20 turnouts! I also followed your example in newsletter #6, both visually and written and found it to work exactly as described!

Thanks again Tim!

Sincerely,
Donnell M. Wells


Top
  
 
Display posts from previous:  Sort by  
Forum locked This topic is locked, you cannot edit posts or make further replies.  [ 12 posts ] 

All times are UTC - 5 hours [ DST ]


Who is online

Users browsing this forum: No registered users and 1 guest


You cannot post new topics in this forum
You cannot reply to topics in this forum
You cannot edit your posts in this forum
You cannot delete your posts in this forum
You cannot post attachments in this forum

Search for:
cron
Powered by phpBB® Forum Software © phpBB Group