Archived board. This is a read-only archive of the Fast Tracks forums, active 2004–2016. Posting closed in May 2016; the board was preserved as a static site in 2026. Some images were lost before archiving and are marked where they appeared.

Fast Tracks

Model Railroading Discussion Forums

Return To The Fast Tracks Website

The Fast Tracks discussion forums have been closed. Click Here for more information.

It is currently Thu Aug 06, 2026 12:00 am

All times are UTC - 5 hours [ DST ]


Forum locked This topic is locked, you cannot edit posts or make further replies.  [ 10 posts ] 
Author Message
 Post subject: #8 switch points
PostPosted: Thu Sep 08, 2005 10:06 pm 
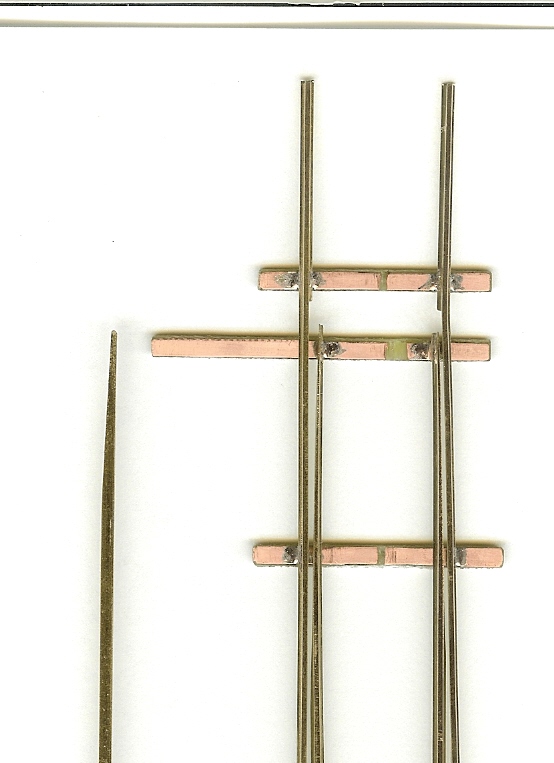
Can you tell me what I am doing wrong in making #8 switch points? I used the point form tool, and the frog points came out perfect, but when I made the switch points they were way off on the angle. The distance from the beginning of the taper to the end, as they came out of the Point Form Tool, is 1/2" on the railhead and 7/8" on the railbase. I hand formed a set that fits and works fine, the distance on the railhead from beginning of taper to the point end is 1-13/16".
I made a pair of #6 turnouts, R & L, using the #6 Point Form Tool and they fit correctly the first time.
I have attached a scanned image of the #8 turnout with a piece of scrap I formed on the #8 Point Form Tool, being sure to use the end marked POINTS. I hope the jpg image makes it thru with this message.


Attachments:
File comment: Note the difference in the point taper length.
Number 8 switch points.jpg
Number 8 switch points.jpg [ 100.32 KiB | Viewed 14033 times ]
Top
  
 
 Post subject:
PostPosted: Fri Sep 09, 2005 11:47 am 
Offline
Site Admin

Joined: Fri May 07, 2004 11:22 pm
Posts: 311
Location: Port Dover, Ontario
(!empty($user->lang['QUOTE'])) ? $user->lang['QUOTE'] : ucwords(strtolower(str_replace('_', ' ', 'QUOTE'))):
Can you tell me what I am doing wrong in making #8 switch points? I used the point form tool, and the frog points came out perfect, but when I made the switch points they were way off on the angle.


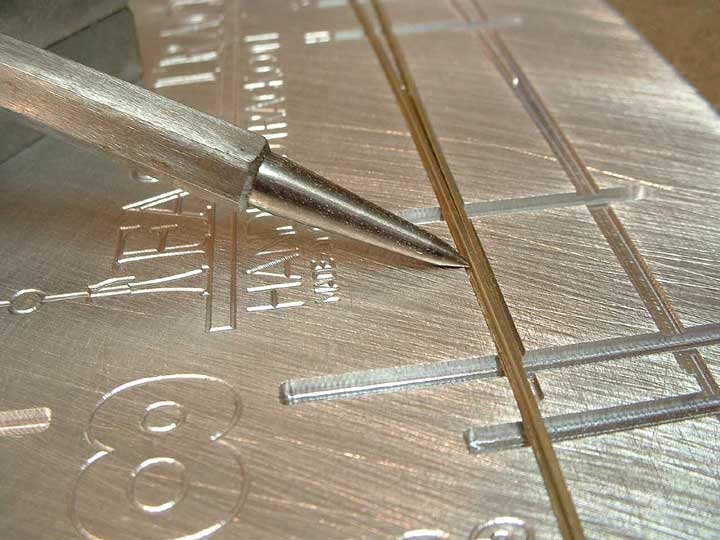
I double checked a #8 switch point made in the PointForm tool in a #8 HO fixture and the angle seems to match very nicely. I did notice however, that if the curved stock rail was not pre-bent prior to placing it into the fixture it may "flex" a bit and create the effect you are referring to. I have attached an image showing how the stock rail needs to be firmly against the outer edge of the groove, highlighted by the pointer next to the rail. If the stock rail is tight against the edge of the groove, the angle on the switch point will closely match the angle of the diverging stock rail. When soldering the stock rail to the PC board ties, ensure it is firmly against the outer edge of the groove.


Attachments:
#8_1.JPG
#8_1.JPG [ 196.18 KiB | Viewed 14012 times ]

_________________
Cheers!

Tim Warris
Fast Tracks
http://www.fast-tracks.net
service@fast-tracks.net
Top
 Profile  
 
 Post subject: #8 switch points
PostPosted: Fri Sep 09, 2005 12:40 pm 
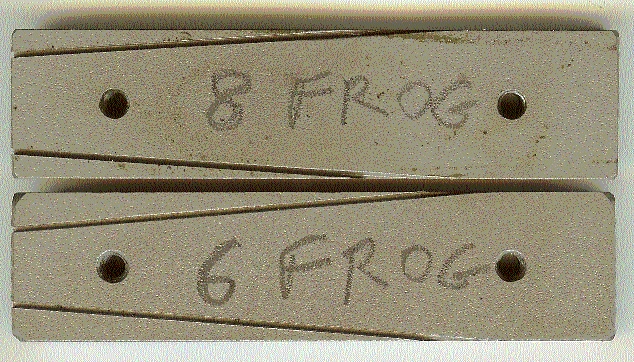
Thanks for the info and photo. I am going to try another #8 turnout. Could you comment on the following? I compared the #6 & #8 Point Form Tools. The #8 frog tool looks to have a more acute angle than the #6 and both fit perfectly. However, the #8 point tool's angle looks less acute than the #6's. I also compared the #8 point on the scrap piece in the previous photo and the point taper is longer on the #6 turnout I made (no altering after using the point form tool to shape either the #6 or #8 ) than the #8 point on the scrap piece. The #8 point tool and the test point on scrap look closer to a #5. Here are a couple of scans to help clarify this.

Thanks again


Attachments:
📷 Attachment lost: Numbers 6 and 8 point tools.jpg
242,512 bytes, uploaded 2005-09-09 — file destroyed in an April 2019 hosting restore, before this archive was made.

Numbers 6 and 8 point tools.jpg [ 236.83 KiB | Viewed 13997 times ]
Numbers 6 and 8 frog tools.jpg
Numbers 6 and 8 frog tools.jpg [ 226.2 KiB | Viewed 13997 times ]
Top
  
 
 Post subject: #8 switch points
PostPosted: Fri Sep 09, 2005 1:17 pm 
Just a follow up comment, something I forgot to mention in the previous posts - the problem with the switch points not matching up was on both the switch rail points, straight as well as diverging. The diverging stock rail curvature was prestressed to where it matched the fixture from end to end.

Thanks


Top
  
 
PostPosted: Fri Sep 09, 2005 6:31 pm 
One thing I notice about new handlayers, is that they dont bend the point rails at the very tips. This causes the points not to fit flush with the stock rails.

How this is done is to look at the points under magnification. if you used the point tool the amount of metal removed from the point is where the fit won't occur. the "tip" is to bend the points towards the stock rail the same distance as the amount of material that was removed from the point tip. To determine where to bend, its usually right where the bevel starts on the points.
And by the way, this bend is almost imperceptable unless you don't do it, and then notice how the points don't fit the stock rail.

Rob


Top
  
 
 Post subject: #8 switch points
PostPosted: Fri Sep 09, 2005 10:22 pm 
Thanks, I'll give that a try, but what I am seeing when I file the points using the point form tool is this: the taper seems too short and the base of the rail hits against the stock rail way before the points get close. I use a 1" belt sander to prep the stock rails, making sure I get all the base removed on the point side and slightly round under the remainder. To get the point to match up I have to make the taper longer and remove more of the base on the taper side of the point (further back along the point) before a good fit occurs. After hand-fitting the points this way the taper length is 3 times the length of the taper when it is removed from the point form tool. As I mentioned earlier, the #6 point taper is much longer than the #8 point taper when they are removed from the point form tool. The #6 points worked the first try, without having to hand fit them. When I have finished the hand fitting it even looks like the point portion of the tie template I printed out and railcars flow thru it easily. I will make a set of both sizes in the next day or so and post pics to try to explain this better.

Thanks


Top
  
 
 Post subject: #8 switch points
PostPosted: Sat Sep 10, 2005 10:20 am 
Thanks for all the information and tips, with this I have been able to see what I was doing wrong. The biggest mistake was not being sure the rail stock was firmly seated as far back as possible, allowing the point tool to "grip" onto the railbase. This will allow the extension of the rail outside of the tool to be further, thus making the taper longer (even longer than the #6 :) ). Slightly bending the tip of the point toward the stock rail also is a big help. I do use a large, lighted, magnifier to see the small detail as I work. I also found it necessary to have rail stock in both sides of the tool when making a part, this helps keep the tool halves parallel and provides a better grip on the railbase.

Having retired from a 30+ year career in electrical/mechanical engineering I guess I may have learned to be too questioning about some things. But, the more knowledge I can get the right, and fast way at my age, the better.


Top
  
 
 Post subject: Stock rail preparations
PostPosted: Sat Sep 10, 2005 5:24 pm 
On the stock rail:

I grind the rail base from the tie just before the points all the way to the dividing lines on the fast track jig. What I mean by dividing lines is where the stock rail and points divide, (theres a little triangle of aluminum that shows where the two rails divide.

After weathering the rail the lack of rail base is hardly noticable. You do want to insure that when you filed the point rails that you remove (for N scale at least 1.5 inches of base. I actually do a little more, as the weathering hides the fact the rail base is filed off, Thus insuring good fit. I call that portion of the filing the "post point jig filing" this is where I refine the points head shape, remove a little more rail base, and camfer the bottom of the point rail edges to reduce friction on the ties.. I also sharpen the points and then bend them as prevously mentioned.

Rob


Top
  
 
 Post subject: #8 switch points
PostPosted: Sat Sep 10, 2005 7:29 pm 
Rob, thanks for all the info. It really has helped me.

From your last statement:
[You do want to insure that when you filed the point rails that you remove (for N scale at least 1.5 inches of base.]

Are you referring to the point rail? I have started removing more of the base rail on them after removing them from the filing jig.

On the stock rails: I am removing the inside rail base to just beyond where the small triangle begins, about 1/16" inch or so beyond.
Being new to handlaying I am trying to learn the right way first. Your experience and sharing of info is really appreciated.


Top
  
 
PostPosted: Mon Sep 12, 2005 12:10 am 
Hello again,

We are talking about the stock rails base, insure its flat all the way to the point where stock rail and point rails split.
You don't want to remove too much rail base on the point rails because it will make it too flexible on the thinner portion of the rail.
But you do want to make sure that you remove enough base so that when the rail closes it will sit flush. I believe depending on the turnouts points and length that its about 1 and 1/2 inch.
There are three bends you need to make, two for the points, and one on the diverging stock rail. This bend in the diverging stock rail is almost no bend at all, very subtle. This helps it seat in the right groove which curves away.
The other two bends are the point rail tips (approx the last inch or so) thats where the points are bent ever so slightly the same amount as the amount of material that was removed from the tips.
That bend is just about an inch from the tips, (depending on how well you made the points in the point jig) Looking at it under magnification the bend point should be (looking at the rail head down) where the jig started to taper the points. If you bend it just right, the points will snuggle up to the stock rail, if you over bend it there will be a gap just past the tips, I use a needle nose and very gently nudge it. Good luck, have fun, and do use magnification.

Rob


Top
  
 
Display posts from previous:  Sort by  
Forum locked This topic is locked, you cannot edit posts or make further replies.  [ 10 posts ] 

All times are UTC - 5 hours [ DST ]


Who is online

Users browsing this forum: No registered users and 1 guest


You cannot post new topics in this forum
You cannot reply to topics in this forum
You cannot edit your posts in this forum
You cannot delete your posts in this forum
You cannot post attachments in this forum

Search for:
cron
Powered by phpBB® Forum Software © phpBB Group