Archived board. This is a read-only archive of the Fast Tracks forums, active 2004–2016. Posting closed in May 2016; the board was preserved as a static site in 2026. Some images were lost before archiving and are marked where they appeared.

Fast Tracks

Model Railroading Discussion Forums

Return To The Fast Tracks Website

The Fast Tracks discussion forums have been closed. Click Here for more information.

It is currently Thu Aug 06, 2026 12:00 am

All times are UTC - 5 hours [ DST ]


Forum locked This topic is locked, you cannot edit posts or make further replies.  [ 12 posts ] 
Author Message
PostPosted: Wed May 31, 2006 10:23 pm 
Offline

Joined: Wed May 31, 2006 10:06 pm
Posts: 2
I want to make turnouts but crossover assembly fixture says that it can also make turnouts. I am wondering how much more difficult it is to make turnouts with a crossover fixture. Would it be better to simply buy a turnout fixture instead? I'm sure I will want to make crossovers eventually so if it is not too complicated, using the crossover assembly would be nicer. Some of the sections comming from the curved part of the crossover assembly's turnouts (I don't know much turnout lingo...) seem a bit short and end in angles (frogs?) so I don't know if it can fit a full turnout.


Top
 Profile  
 
 Post subject:
PostPosted: Sat Jun 03, 2006 1:26 pm 
Offline
Site Admin

Joined: Fri May 07, 2004 11:22 pm
Posts: 311
Location: Port Dover, Ontario
(!empty($user->lang['QUOTE'])) ? $user->lang['QUOTE'] : ucwords(strtolower(str_replace('_', ' ', 'QUOTE'))):
I am wondering how much more difficult it is to make turnouts with a crossover fixture.


Building a turnout in the crossover fixture is not any more difficult than with the standard fixture, and if you plan on making a crossover in the future this is a more economical approach.

The only difference is there are additional pockets in the fixture for the crossover version, and you will have to identify which pockets are to be used for the turnout. This can be simply done by comparing it to a printed tie template which are included on the CD that accompanies the fixture.

_________________
Cheers!

Tim Warris
Fast Tracks
http://www.fast-tracks.net
service@fast-tracks.net


Top
 Profile  
 
 Post subject:
PostPosted: Sun Jun 04, 2006 11:00 pm 
Offline

Joined: Wed May 31, 2006 10:06 pm
Posts: 2
Thank you. I can't wait to start making turnouts/crossovers!


Top
 Profile  
 
 Post subject:
PostPosted: Thu Jun 08, 2006 10:51 pm 
Offline

Joined: Wed Sep 21, 2005 8:33 pm
Posts: 12
I have built several turnouts with the #6 crossover jig and find it very easy to use. I used a Sharpie marker to mark the tie slots to be used for the turnouts. Perhaps a helpful addition to the crossover jig would be to mark the slots during the machining process with a small "T" or something. Just a thought.

Rick


Top
 Profile  
 
 Post subject:
PostPosted: Mon Jun 12, 2006 4:58 pm 
Offline

Joined: Mon Nov 14, 2005 8:50 pm
Posts: 73
Location: Cassville, MO
I use both the #6 & #8 crossover fixtures for standard turnouts. I have made about 30 of each size so far, both RH & LH. It is just as easy as making a TO on a regular TO fixture. I keep printouts handy of all the TO sizes I make for reference, especially for PCB tie placement in the TO's. I use crossover PCB ties to make standard TO's with. It only takes 5 of them (plus one regular TO PCB tie for the throw bar) for a std. #8 TO and hardly any waste!

Good luck!


Top
 Profile  
 
 Post subject:
PostPosted: Thu Aug 17, 2006 5:17 am 
Where you get it???


Top
  
 
 Post subject:
PostPosted: Fri Aug 18, 2006 8:53 am 
Offline

Joined: Mon Nov 14, 2005 8:50 pm
Posts: 73
Location: Cassville, MO
I have found that the Fast Tracks fixtures are the easiest to use and are very precision. I use them only, except for non-standard items. All my fixtures and supplies were ordered direct from Fast Tracks.


Top
 Profile  
 
PostPosted: Fri Jun 15, 2007 1:47 pm 
Offline

Joined: Mon May 14, 2007 9:21 pm
Posts: 10
Location: Harrisburg, Pa
I have just purchased the #8 double crossover and I need a bit of advice. Since I bought the kit, a point-form tool was included but the frogs on the crossing appear to be different than the #8 frog on the jig, What do I use for the crossing frogs?

Regards,
Nick Kulp


Top
 Profile  
 
PostPosted: Fri Jun 15, 2007 2:04 pm 
Offline
Site Admin

Joined: Fri May 07, 2004 11:22 pm
Posts: 311
Location: Port Dover, Ontario
cornwall9 (!empty($user->lang['WROTE'])) ? $user->lang['WROTE'] : ucwords(strtolower(str_replace('_', ' ', 'WROTE'))):
I have just purchased the #8 double crossover and I need a bit of advice. Since I bought the kit, a point-form tool was included but the frogs on the crossing appear to be different than the #8 frog on the jig, What do I use for the crossing frogs?

Regards,
Nick Kulp


Hi Nick,

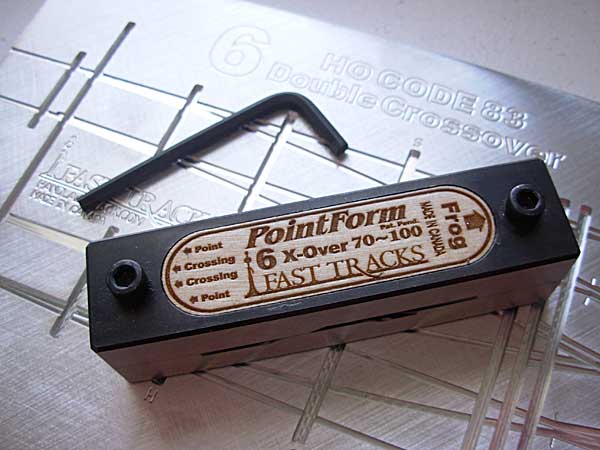
Included with the kit should be a #8 Crossover Pointform tool. These tools have an additional set of grooves for forming the additional sized frog in the centre of a crossover. It should look like the image below.

Is this the one that was included with your kit? ($6 shown in image, yours should be a #8)


Attachments:
Combo-PointForm-tool-for-Cr.jpg
Combo-PointForm-tool-for-Cr.jpg [ 35.34 KiB | Viewed 15448 times ]

_________________
Cheers!

Tim Warris
Fast Tracks
http://www.fast-tracks.net
service@fast-tracks.net
Top
 Profile  
 
 Post subject: Crossover pointform tool
PostPosted: Fri Jun 15, 2007 4:48 pm 
Offline

Joined: Mon May 14, 2007 9:21 pm
Posts: 10
Location: Harrisburg, Pa
Hi Tim,
One was definitely in the kit, very nice graphic, by the way. The mystery is that the documentation for the crossover or the #8 switch do not show how to use the tool. I'm may just be dense <VBG> I watched the video and downloaded every User Guide I thought of but the crossing part is just not really covered. I wanted to ask before I ruined some of the precious rail I have. I understand that you are redoing some of the User Guides and IMOHO the double crossover is one that seems to require a bit more than the current 8 pages. What is there is excellent but forming the crossing frogs is not covered at all.

One other small question. The AN for forming and placing the stock rails is not current. The link goes to the Zen of Spiking.

These are just nit-picks. The overall documentation and the tools are top-drawer. I expect to be making a lot more purchases as my layout rebuild progresses.

Regards,
Nick Kulp

Hi Nick,

Included with the kit should be a #8 Crossover Pointform tool. These tools have an additional set of grooves for forming the additional sized frog in the centre of a crossover. It should look like the image below.

Is this the one that was included with your kit? ($6 shown in image, yours should be a #8


Top
 Profile  
 
PostPosted: Sat Jun 16, 2007 11:52 am 
Offline

Joined: Mon Nov 21, 2005 9:28 pm
Posts: 44
cornwall9 (!empty($user->lang['WROTE'])) ? $user->lang['WROTE'] : ucwords(strtolower(str_replace('_', ' ', 'WROTE'))):
Hi Tim,
One was definitely in the kit, very nice graphic, by the way. The mystery is that the documentation for the crossover or the #8 switch do not show how to use the tool. I'm may just be dense <VBG> I watched the video and downloaded every User Guide I thought of but the crossing part is just not really covered. I wanted to ask before I ruined some of the precious rail I have. I understand that you are redoing some of the User Guides and IMOHO the double crossover is one that seems to require a bit more than the current 8 pages. What is there is excellent but forming the crossing frogs is not covered at all.

I hope you're not still waiting... The end marked frog AND crossing has 4 holes. Use the inner ones for everything but the frogs (which correspond to the frogs on a normal turnout). It's easier to see if you compare it to a normal turnout track template. Call the other ones Toads. :-)

Jim


Top
 Profile  
 
 Post subject: Toads and Frogs
PostPosted: Sat Jun 16, 2007 3:46 pm 
Offline

Joined: Mon May 14, 2007 9:21 pm
Posts: 10
Location: Harrisburg, Pa
I appreciate the help. Excuse me, my village just called and they saw their idiot was missing..... Once I actually started looking more closely at the tool, I did see the extra holes. I gave it a try and it worked, imagine that. Thanks for the great tools.
Regards,
Nick Kulp


Top
 Profile  
 
Display posts from previous:  Sort by  
Forum locked This topic is locked, you cannot edit posts or make further replies.  [ 12 posts ] 

All times are UTC - 5 hours [ DST ]


Who is online

Users browsing this forum: No registered users and 1 guest


You cannot post new topics in this forum
You cannot reply to topics in this forum
You cannot edit your posts in this forum
You cannot delete your posts in this forum
You cannot post attachments in this forum

Search for:
cron
Powered by phpBB® Forum Software © phpBB Group