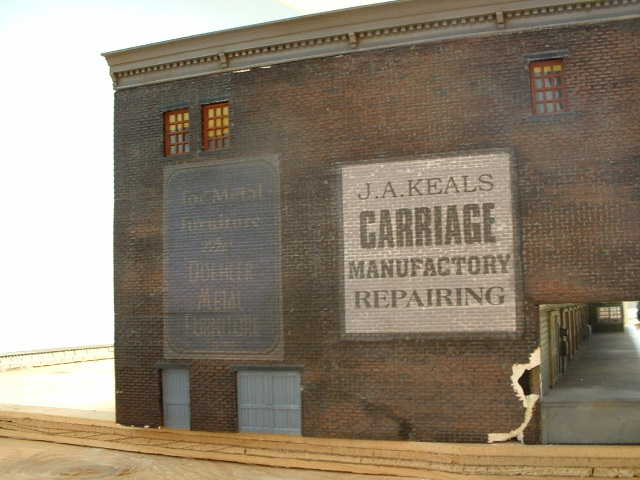
Creating Signs That Look RealBy Tim Warris (This newsletter was originally published on March 3, 2003)All of the
signs that you see at Port Kelsey are an illusion. They are not 'faded' or 'aged' at all, nor was the paper sanded through. (A technique that I have yet to master!) Instead my signs are simply printed with an ink jet printer and glued to the wall with white glue.
To create your own realistic looking signs you will need the following equipment and software:
- A computer.
- A flatbed scanner. Just about any resolution will work.
- An ink jet printer.
- Some sort of graphic drawing software such as CorelDRAW.
- Some sort of photo editing software such as Photoshop. (It is possible to just use Photoshop for both drawing and photo editing.)
- Ordinary ink jet paper. (White)
- Sandpaper and sanding block.
- White glue.
Step 1 - Build A WallFirst you need to build, paint and weather a wall until you are satisfied you have the look that you want.
Step 2 - Scan The WallNow, take a section of the wall and lay it onto the glass of your flatbed scanner. Set the scanner's resolution to it's highest possible setting and scan the wall. Save the image as a TIFF file. (Don't save the image as a JPEG as that will reduce the quality.)
Step 3 - Find Or Create Your SignSearch the Internet to find some good pictures of authentic building signs. One way of searching for old signs is to use the Image search tools at
Google or
AltaVista. Enter the words 'vintage signs' and you will get about a 100 images at Google and over 600 at AltaVista. You can try other variations such as 'antique signs', 'old signs', 'building signs', and so on.
There are also a couple of websites exclusively dedicated to old signs. A couple that I like are,
Fading Ad Campaign and
Forgotten NY Ads. If you look through their collections you may recognize some of the Port Kelsey signs.
Once you have found a sign that you like, re-draw it from scratch. My preference is to use CorelDRAW to draw my signs, but it is possible to use Photoshop or one of the many other capable drawing packages out there.
I don't recommend that you scan or try to use the original image. You really need to redraw the image in order to achieve the highest degree of realism
Draw the sign at its final size and save the drawing as a TIFF file. (Again, don't save it as a JPEG image.)
Step 4 - Build Your SignOK, this step will require Photo editing software with some kind of 'fade' or 'opacity' adjustment function. Photoshop is your best option, but there are others that will work just as well. (And are either free, or a whole lot cheaper!)
The rest of the instructions in step 4 will assume that you are using Photoshop 7 and have a little bit of experience with the software. You will have to modify the procedure a bit to suit the software that you are using.
- Start Photoshop and open both the brick wall and sign drawing files that you created in steps 2 and 3.
- Using the Move tool, drag the sign image into the brick wall image and position it to where you want it to go. Use the arrow keys to precisely nudge the sign image into place.
- Make the sign image is the current Layer and then use the Opacity slider tool to fade the sign image so that the brick wall image shows through the sign image. The Opacity slider can be found in the Layers toolbox. By adjusting the opacity of the sign layer you can make the sign look fairly new or even just barely visible with a faint smudge of color.
- After you are satisfied, crop the entire image to your final size.
- Print the image on plain white ink jet paper and viola! you have a sign that looks faded with brickwork that precisely matches your wall!
Step 5 - Prepare The Sign For MountingTake a piece of sandpaper glued to a block and sand the back of the sign at the edges. Done properly you can make the edges of the sign almost invisible.
Step 6 - Mount Your SignGlue the sign to the wall using white glue. The glue will make the paper very pliable, allowing you to press it into the brickwork.
Step 7 - Admire Your WorkThe combination of the brickwork printed on the sign and the matching texture of the wall will give you incredibly realistic results!
I am confident that you will be very pleased with the results that you will get using this technique. If you use this method, email the results to me at tim@handlaidtrack.com. I would love to see your work!
- Tim
---------------------------------------
Have a question or comment about this issue of the Fast Tracks newsletter? Then post a reply! I will be happy to respond to any posts. - Tim

 Login
Login FAQ
FAQ Search