Archived board. This is a read-only archive of the Fast Tracks forums, active 2004–2016. Posting closed in May 2016; the board was preserved as a static site in 2026. Some images were lost before archiving and are marked where they appeared.

Fast Tracks

Model Railroading Discussion Forums

Return To The Fast Tracks Website

The Fast Tracks discussion forums have been closed. Click Here for more information.

It is currently Thu Aug 06, 2026 12:00 am

All times are UTC - 5 hours [ DST ]


Forum locked This topic is locked, you cannot edit posts or make further replies.  [ 7 posts ] 
Author Message
 Post subject: Rail Positions in Jig
PostPosted: Sun Apr 27, 2008 11:56 pm 
Offline

Joined: Sun Mar 30, 2008 12:06 am
Posts: 12
Well, after building two turnouts in my new fixture, I have three questions.

1. When filing the curved stock rail I'm very gentle and make sure to keep the rail flat. When I'm finished filing, I check to make sure it's still flat, and it is, but when I solder it to the ties in the jig, the rail wants to lift up at the throwbar end of the turnout; only the curved stock rail wants to lift. Is anybody else experiencing this problem? How do I install the rail so it will sit flat on it's own?

2. Regarding cutting the gaps in the frog rails: The tie template indicates that I cut the gap between the two longest PCB ties, but the soldered frog is very much in contact with both the ties; it does not diverge quick enough. It looks as though I need to add another PCB ties and cut the gap between the second and the third tie, or did I get a bad fixture? This doesn't seem to be a problem with the sharper numbered turnouts; I'm using a #7.

3. Regarding positioning of the closure rails in the jig: The closure rails are able to slide back and forth in the jig, towards the frog and back away from it. Where should I position the closure rails for best operation? As close as possible to the frog or should I pull them as far away from it? I'm thinking they should be pushed as close to the frog as possible so as so narrow the gap between them and the frog point.

Thanks for any thoughts, Brent


Top
 Profile  
 
 Post subject:
PostPosted: Mon Apr 28, 2008 8:58 am 
Offline
User avatar

Joined: Sat Aug 13, 2005 10:48 am
Posts: 365
Location: East Texas - USA
Your first problem with the curved stock rail is because it has both a narrowed file slot and has been curved to fit. Heat from the soldering wants to 'normalize' the rail back towards a straight and thus will have it curve up. You want to slightly 'over curve' the rail a bit and then fit into the fixture. You will also want to use a heavy weight when doing the soldering. This will keep it in place and result in a smooth flat transition.

Gaps on the frogs should be at the point where the rails diverge at least a bit greater than the width of a wheel. Check the template with the fixture. I much prefer to add one additional PC tie farther out along the diverging rails to support the two short rails beyond the frog.

Positioning the closure rails is one of the 'arts' that needs attention. You will want the flangeway gap to be as small as possible - so position so the wing is as close as the fixture allows. However, be certain that the bend at the wing to closure is set precisely in line with the frog other running rail. I will lay in the frog with a bit tighter clearances as I can get, then when completed use a very thin screw slot file to open the flangways and perfectly align the flangeway straight through - making the running rail heads correctly aligned.

-ed-

_________________
-ed mccamey-
COSLAR RR - http://www.coslar.us/
NMRA Standards and Conformance Department
PROTO & FINE Scale Coordinator
I estimate I have about 5 pounds of coupler springs somewhere in the vicinity of my workbench.


Top
 Profile  
 
 Post subject: Point's Improvement
PostPosted: Mon May 05, 2008 11:29 pm 
Offline

Joined: Sun Mar 30, 2008 12:06 am
Posts: 12
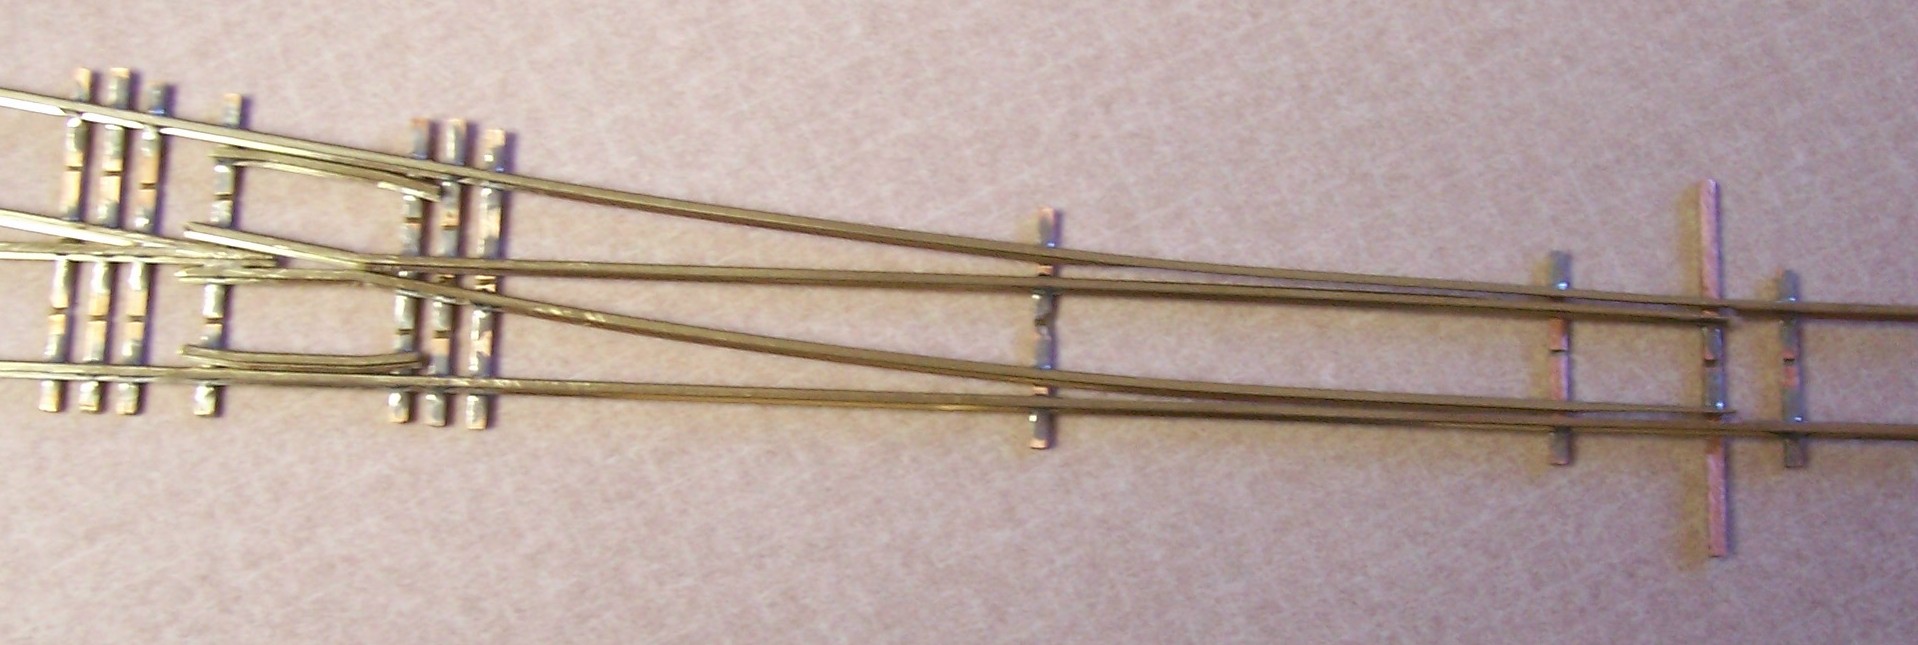
Okay, well now I've constructed four of this monsters, and I think I'm getting the hang of it. I've got to a point now that the frog seems to be at an acceptable level, and I can barely feel the frog as I run a small ore car over it. (Or should I not feel it at all) I know it's a heck of a lot smoother than some Peco turnouts I have lying around. Maybe I'm taking the battle in that department, so I wanted to asked if anybody has any suggestions to improve my points?

I now think that these are one of the hardest parts to get running smoothly. I file away plenty of the base on both sides, but I can't seem to get the tangent closure rail point to tuck up nice and snugly to the curved stock rail. It appears to me that the angle on the tangent closure rail is not sharp enough, and therefore leaves the point sticking out. I basically file the point down so it blends in with the stock rail to get it running smoothly, sort of anyways, but I'm hoping for a better result perhaps? What do you pros do in this area? I've even tried filing a very slight notch in the railhead of the stock rail where the point needs to tuck in, but this doesn't seem to be the portion that's causing the problem, it's the rail head just a little further along right near the base of the angle on the closure rail that's causing the problem. Just to note as well, I've made sure that the curved stock rail was pushed as far as possible away from the track centerline in the jig prior to soldering, the gauge is as wide as the assembly fixture will allow.

Any suggestions for some improvements before the next one is started? Below is a picture of the latest creation to come out in one piece, lol... Sorry for the bad quality, my camera doesn't seem to like the closeups very much(this was the best of 16.) Any thoughts on what it looks like?

Cheers, Brent


Attachments:
100_0679.jpg
100_0679.jpg [ 272.95 KiB | Viewed 11467 times ]
Top
 Profile  
 
PostPosted: Tue May 06, 2008 12:51 am 
Offline

Joined: Mon May 10, 2004 4:02 pm
Posts: 52
If you go back to the picture take the cursor and go along the rail from the frog towards the point blade you will see where you went wrong. (not really wrong just not completed yet)

As you cursor goes along the rail its a nice striaight line until it reaches the tie where you file of material for the point rails. The tie is the key to finding that spot where the file took off material. Take your needle noise pliers grab the rail, and give a slight twist to make that line straight . If you did it right the point rail will fit nice and flush with the stock rail, if not it will be worse.

rob

_________________
Rob de Rebel


Top
 Profile  
 
 Post subject:
PostPosted: Tue May 06, 2008 3:05 am 
Offline

Joined: Sun Mar 30, 2008 12:06 am
Posts: 12
I MAY be mis-interpreting your instructions, but that straight closure rail is already straight... should I be putting a kink in it right at the end about where the tie is? I don't remember reading about this or seeing it in the video. Could you clarify a little more.

Thanks, Brent


Top
 Profile  
 
PostPosted: Tue May 06, 2008 4:45 am 
Offline

Joined: Mon May 10, 2004 4:02 pm
Posts: 52
I'm referring to the fit of the points to the stock rail. The bend amount is equivelant to the amount of material removed from the points.

Rob

_________________
Rob de Rebel


Top
 Profile  
 
PostPosted: Mon Aug 18, 2008 2:09 pm 
Offline

Joined: Thu Aug 14, 2008 4:11 pm
Posts: 14
If I understand Rob correctly, what he's saying is that when you file the points, the unfiled edge is straight, and the filed edge has the taper. Lightly bend the rail at the point where the taper starts, "straightening" out the taper and now the unfiled side is no longer straight.


Top
 Profile  
 
Display posts from previous:  Sort by  
Forum locked This topic is locked, you cannot edit posts or make further replies.  [ 7 posts ] 

All times are UTC - 5 hours [ DST ]


Who is online

Users browsing this forum: No registered users and 1 guest


You cannot post new topics in this forum
You cannot reply to topics in this forum
You cannot edit your posts in this forum
You cannot delete your posts in this forum
You cannot post attachments in this forum

Search for:
cron
Powered by phpBB® Forum Software © phpBB Group