Archived board. This is a read-only archive of the Fast Tracks forums, active 2004–2016. Posting closed in May 2016; the board was preserved as a static site in 2026. Some images were lost before archiving and are marked where they appeared.

Fast Tracks

Model Railroading Discussion Forums

Return To The Fast Tracks Website

The Fast Tracks discussion forums have been closed. Click Here for more information.

It is currently Thu Aug 06, 2026 12:00 am

All times are UTC - 5 hours [ DST ]


Forum locked This topic is locked, you cannot edit posts or make further replies.  [ 13 posts ] 
Author Message
 Post subject: Lets see 'em!
PostPosted: Wed Mar 04, 2009 1:28 pm 
Offline
Site Admin

Joined: Fri May 07, 2004 11:22 pm
Posts: 311
Location: Port Dover, Ontario
Hi,

We get lots of pictures sent to us via email and here on the forum of modelers trackwork masterpieces, and until now these images would not always be accessible.

With this forum we now have a location to post images of our work, and we will even host the images for you!

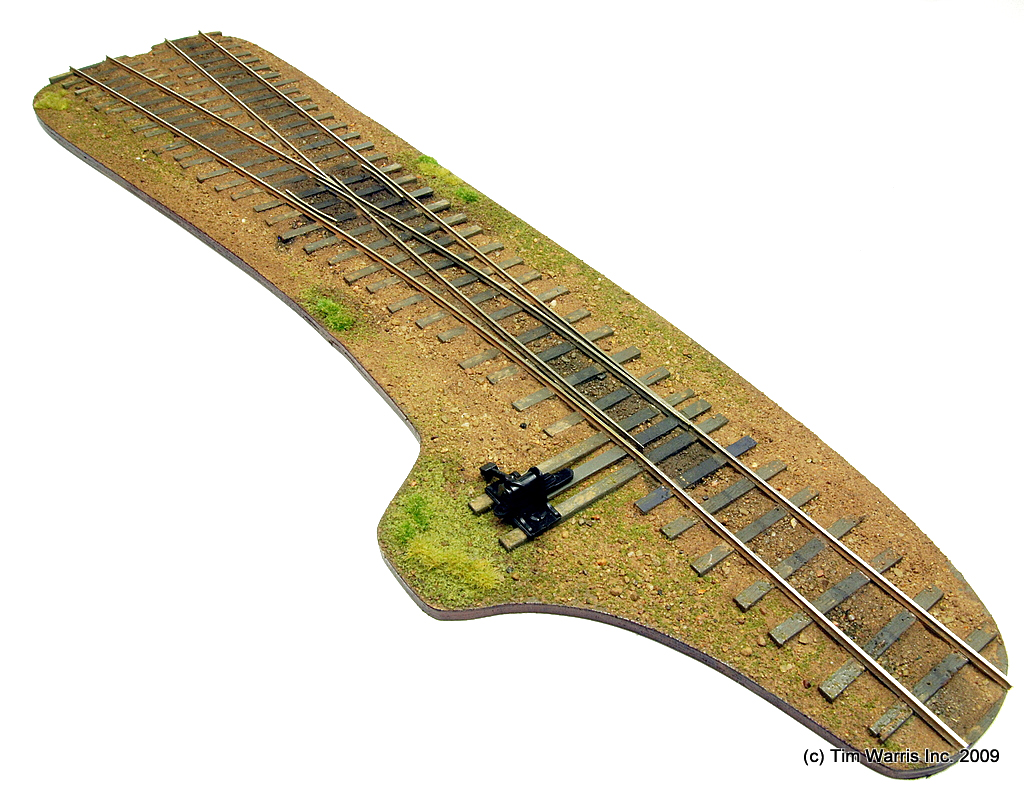
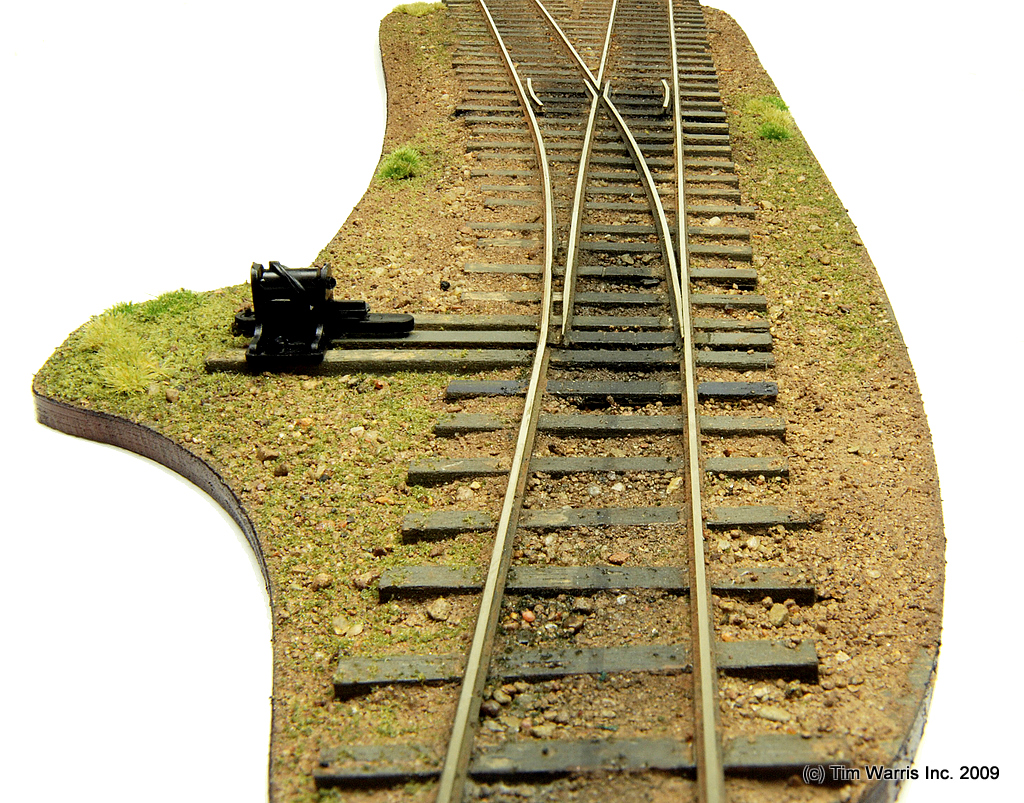
To prime the pump, here are a couple of images of an On30 #6 code 70 turnout I built recently for a display.

Image

Image

Don't be shy, we would love to see everyone's work!

_________________
Cheers!

Tim Warris
Fast Tracks
http://www.fast-tracks.net
service@fast-tracks.net


Top
 Profile  
 
 Post subject: Re: Lets see 'em!
PostPosted: Mon Mar 16, 2009 5:54 pm 
Offline

Joined: Sat Jun 24, 2006 2:55 pm
Posts: 1
Hi Tim
a couple of pics of my trackwork , 3 ways turnout#6 built from printed tie template and outside single slip (my template) both N gauge ME code55
Danilo


Attachments:
📷 Attachment lost: outside3.jpg
76,267 bytes, uploaded 2009-03-16 — file destroyed in an April 2019 hosting restore, before this archive was made.

outside3.jpg [ 74.48 KiB | Viewed 26314 times ]
📷 Attachment lost: triplo6.jpg
118,143 bytes, uploaded 2009-03-16 — file destroyed in an April 2019 hosting restore, before this archive was made.

triplo6.jpg [ 115.37 KiB | Viewed 26310 times ]
Top
 Profile  
 
 Post subject: Hello, I'm the new one
PostPosted: Fri Apr 10, 2009 5:56 pm 
Offline

Joined: Fri Mar 27, 2009 4:43 pm
Posts: 5
Hello,

perhaps the best way to say hello. I'm a model railroader from Germany and here are some pictures of my current work:

📷 Image no longer available
Originally hosted at www.bilder-hochladen.net — the host went away before this archive was made.


📷 Image no longer available
Originally hosted at www.bilder-hochladen.net — the host went away before this archive was made.


📷 Image no longer available
Originally hosted at www.bilder-hochladen.net — the host went away before this archive was made.


Image
Joerg

_________________
Greetings from Lower Saxonia, Germany
Joerg

my Indiana City Layout:
http://www.the-gauge.net/forum/viewtopic.php?f=46&t=5379


Top
 Profile  
 
 Post subject: Re: Lets see 'em!
PostPosted: Tue Feb 01, 2011 4:49 pm 
Offline

Joined: Fri Jan 28, 2011 4:23 pm
Posts: 2
Looks good are you using the track jig or just the pcb ties.


Top
 Profile  
 
 Post subject: Re: Lets see 'em!
PostPosted: Fri Feb 04, 2011 2:20 pm 
Offline

Joined: Fri Mar 27, 2009 4:43 pm
Posts: 5
just the pcb ties.

_________________
Greetings from Lower Saxonia, Germany
Joerg

my Indiana City Layout:
http://www.the-gauge.net/forum/viewtopic.php?f=46&t=5379


Top
 Profile  
 
 Post subject: Re: Lets see 'em!
PostPosted: Fri Feb 04, 2011 5:29 pm 
Offline

Joined: Fri Jan 28, 2011 4:23 pm
Posts: 2
Can you give me some more info on how you do that that is what I been trying to do and have not been able to get it to come out right. thanks for any info you might be able to give me


Top
 Profile  
 
 Post subject: Re: Lets see 'em!
PostPosted: Thu Feb 10, 2011 12:59 am 
Offline

Joined: Fri Mar 27, 2009 4:43 pm
Posts: 5
The easiest way to learn it is to view the videos on the fast Tracks homepage.

Thats the way how i learnd it.

The templates for the turnouts you can download there too.

My templates for straight and curved tracks are selfmade by using a CAD programm

_________________
Greetings from Lower Saxonia, Germany
Joerg

my Indiana City Layout:
http://www.the-gauge.net/forum/viewtopic.php?f=46&t=5379


Top
 Profile  
 
 Post subject: Re: Lets see 'em!
PostPosted: Thu Oct 11, 2012 9:13 am 
Offline
User avatar

Joined: Sun Sep 19, 2010 6:05 am
Posts: 51
Location: Rotterdam
📷 Image no longer available
Originally hosted at fbcdn-sphotos-e-a.akamaihd.net — the host went away before this archive was made.


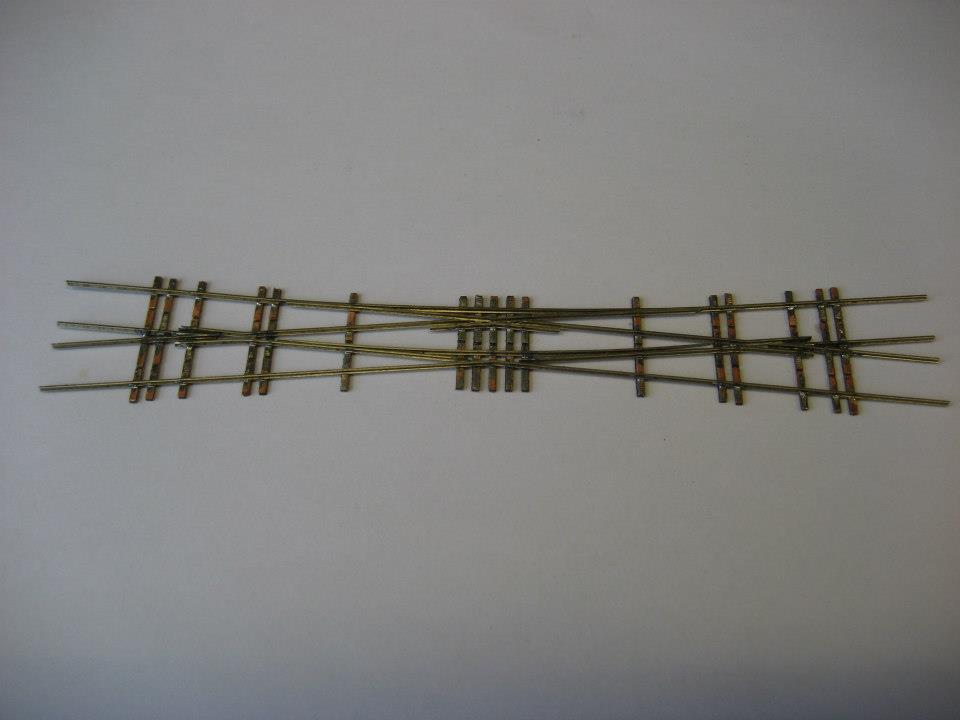
Hereby my first N-scale code 40 cross-over. It's working, but only just. With the points I found that the numbers 2,3 and 4 each had a massive improvement in easyness of building and quality. Given the fact that a cross-over is just "a complicated couple of combined points" my assumption is that the numbers 2 and 3 will be much better.

So this will stay a "demo only". For more pictures: if you are on Facebook, search for "Handwissel" and you will find more information on my various attempts and findings. The comments are just in Dutch for now, but I intend to add English comments as well

_________________
Paul Bender

Everybody can shovel, firing is an art

📷 Image no longer available
Originally hosted at i279.photobucket.com — the host went away before this archive was made.

Firing this train was more fun then hard labor :-) © R. de Water


Top
 Profile  
 
 Post subject: Re: Lets see 'em!
PostPosted: Fri Oct 12, 2012 10:47 am 
Offline
User avatar

Joined: Sun Sep 19, 2010 6:05 am
Posts: 51
Location: Rotterdam
A bit more on how I got there:

📷 Image no longer available
Originally hosted at fbcdn-sphotos-b-a.akamaihd.net — the host went away before this archive was made.


The drawing of the various pieces of rail. Partly for making the whole assembly a bit more firm I wanted some through going rail (you are building the cross-over on a jig for half a cross-over) Probably in hO it is fine to connect the two pieces together on the middle tie. In N-scale a tie is 1.5 mm, so half a tie width is 0.75 mm That’s a bit flimsy for a mechanical connection in my view. Partly to keep the project buildable. Especially in N-scale you more or less have to build from the inside out to keep everything accessible for soldering


📷 Image no longer available
Originally hosted at fbcdn-sphotos-h-a.akamaihd.net — the host went away before this archive was made.


The schedule of cross-over innerparts en the live version. The bits I should have done first (see previous picture) where the black bits. I assume it makes even more sense to place the black innerparts first in the two “half-jigs” and only after that connect the two halves together by the black outerrails en the green innerguard rails, by which the two halves will be connected.

📷 Image no longer available
Originally hosted at fbcdn-sphotos-c-a.akamaihd.net — the host went away before this archive was made.


The first bit of the innercrossing

📷 Image no longer available
Originally hosted at fbcdn-sphotos-f-a.akamaihd.net — the host went away before this archive was made.


Now the "black pieces" of rail are in place as well. The tips of the frogs are nearly impossible to reach with the tip of your solder-iron with this building sequence

For the really good looking viewers: There is an error in this cross-over. The bottom trinagle contains a gap, which shouldn't be there, because there is no isolationgap needed at that place. The joint should have been at the middle ofthe next tie. The top one has the same error. Only there the gap is smaller.

📷 Image no longer available
Originally hosted at fbcdn-sphotos-e-a.akamaihd.net — the host went away before this archive was made.


An ammended schedule, but it is likely that this sequence is not optimal as well. Nr 2 cross-over will be build in the sequence 2-1-3

📷 Image no longer available
Originally hosted at fbcdn-sphotos-c-a.akamaihd.net — the host went away before this archive was made.


The finished product. One of the top prioreties is to alter my soldering technique. My solderingskills come from PCB repairs. There you want a good firm connection. This is fine for electronics but not to good for macropictures like this. So a bit more attention to the "right amount" of solder to apply is needed.

But like I said: check Facebook / Handwissel for the regular updates on the learning curve

_________________
Paul Bender

Everybody can shovel, firing is an art

📷 Image no longer available
Originally hosted at i279.photobucket.com — the host went away before this archive was made.

Firing this train was more fun then hard labor :-) © R. de Water


Top
 Profile  
 
 Post subject: Re: Lets see 'em!
PostPosted: Sun Oct 14, 2012 12:41 pm 
Offline
User avatar

Joined: Sun Sep 19, 2010 6:05 am
Posts: 51
Location: Rotterdam
Image
The first build of a single slipswitch

📷 Image no longer available
Originally hosted at fbcdn-sphotos-b-a.akamaihd.net — the host went away before this archive was made.

The "inner-crossing"

📷 Image no longer available
Originally hosted at fbcdn-sphotos-f-a.akamaihd.net — the host went away before this archive was made.

And now with the pointblades connected

📷 Image no longer available
Originally hosted at fbcdn-sphotos-g-a.akamaihd.net — the host went away before this archive was made.

And, as you can see: without hinged points

_________________
Paul Bender

Everybody can shovel, firing is an art

📷 Image no longer available
Originally hosted at i279.photobucket.com — the host went away before this archive was made.

Firing this train was more fun then hard labor :-) © R. de Water


Top
 Profile  
 
 Post subject: Re: Lets see 'em!
PostPosted: Sun Oct 14, 2012 12:47 pm 
Offline
User avatar

Joined: Sun Sep 19, 2010 6:05 am
Posts: 51
Location: Rotterdam
Image
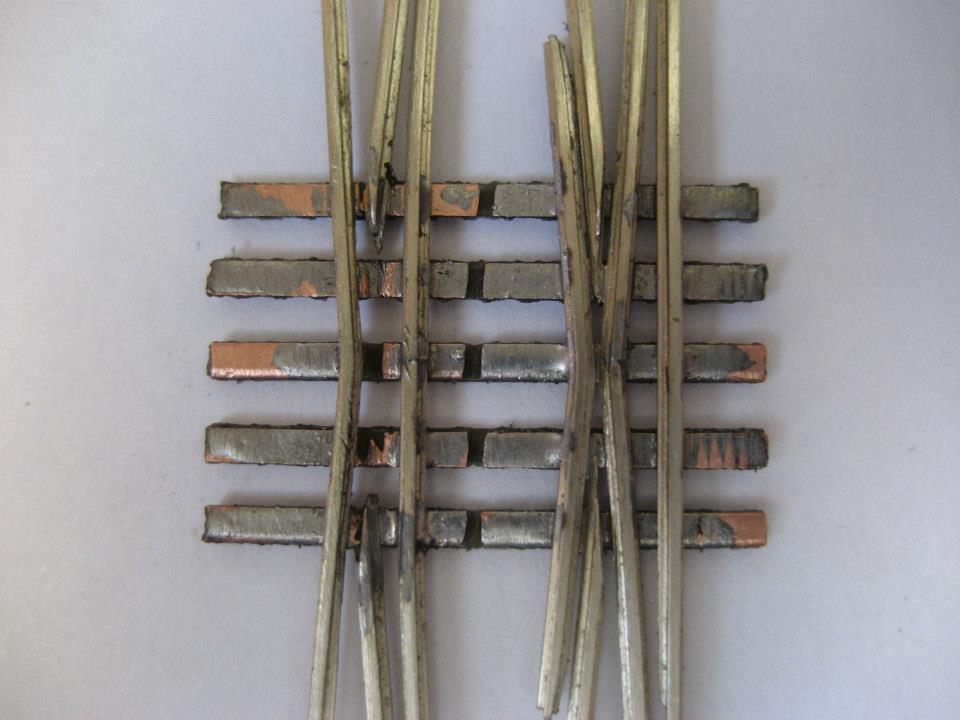
Detailed picture of the innercrossing. I wish it had not been but........ It isn't brilliantly running and the fault is somewhere down here. And yes I known that I mis a guardrail at the lefthand side. However the gap remaining for the guardrail is 1.5 mm :-/

📷 Image no longer available
Originally hosted at fbcdn-sphotos-g-a.akamaihd.net — the host went away before this archive was made.

End now the single slip is working is well. With the use of a FT jig it is required that the "incoming rail" ( between the outer and guardrail) with point ends between the first and second tie. Not very scientific, but likely "good enough"

📷 Image no longer available
Originally hosted at fbcdn-sphotos-e-a.akamaihd.net — the host went away before this archive was made.

The, working, crossing

📷 Image no longer available
Originally hosted at fbcdn-sphotos-c-a.akamaihd.net — the host went away before this archive was made.

The, now working, single slip

_________________
Paul Bender

Everybody can shovel, firing is an art

📷 Image no longer available
Originally hosted at i279.photobucket.com — the host went away before this archive was made.

Firing this train was more fun then hard labor :-) © R. de Water


Top
 Profile  
 
 Post subject: Re: Lets see 'em!
PostPosted: Sat Dec 15, 2012 2:08 pm 
Offline
User avatar

Joined: Sun Sep 19, 2010 6:05 am
Posts: 51
Location: Rotterdam
📷 Image no longer available
Originally hosted at fbcdn-sphotos-e-a.akamaihd.net — the host went away before this archive was made.


📷 Image no longer available
Originally hosted at fbcdn-sphotos-a-a.akamaihd.net — the host went away before this archive was made.


A half slip with solid point and it seems to be working. The next one will go into a test track and after that ........ a double slip. I got some idea's on how to make it work with solid pointblades as well, but that will require a couple of test builds as well

_________________
Paul Bender

Everybody can shovel, firing is an art

📷 Image no longer available
Originally hosted at i279.photobucket.com — the host went away before this archive was made.

Firing this train was more fun then hard labor :-) © R. de Water


Top
 Profile  
 
 Post subject: Re: Lets see 'em!
PostPosted: Tue Sep 03, 2013 12:35 am 
Offline

Joined: Sun Aug 19, 2012 12:15 pm
Posts: 6
Location: Winston-Salem, NC
Love the fact that I can build my own turnouts... they beat the heck out of commercial turnouts any day... :D


Attachments:
📷 Attachment lost: 20130831_101536.jpg
5,855,527 bytes, uploaded 2013-09-03 — file destroyed in an April 2019 hosting restore, before this archive was made.

20130831_101536.jpg [ 5.58 MiB | Viewed 21401 times ]
Top
 Profile  
 
Display posts from previous:  Sort by  
Forum locked This topic is locked, you cannot edit posts or make further replies.  [ 13 posts ] 

All times are UTC - 5 hours [ DST ]


Who is online

Users browsing this forum: No registered users and 1 guest


You cannot post new topics in this forum
You cannot reply to topics in this forum
You cannot edit your posts in this forum
You cannot delete your posts in this forum
You cannot post attachments in this forum

Search for:
cron
Powered by phpBB® Forum Software © phpBB Group