Archived board. This is a read-only archive of the Fast Tracks forums, active 2004–2016. Posting closed in May 2016; the board was preserved as a static site in 2026. Some images were lost before archiving and are marked where they appeared.

Fast Tracks

Model Railroading Discussion Forums

Return To The Fast Tracks Website

The Fast Tracks discussion forums have been closed. Click Here for more information.

It is currently Thu Aug 06, 2026 12:00 am

All times are UTC - 5 hours [ DST ]


Forum locked This topic is locked, you cannot edit posts or make further replies.  [ 33 posts ]  Go to page Previous  1, 2, 3  Next
Author Message
 Post subject:
PostPosted: Tue Jan 03, 2006 3:15 pm 
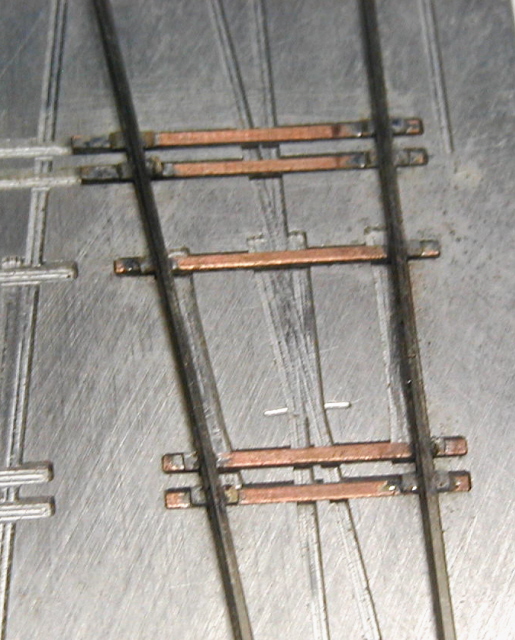
This is a picture of a code 55 #8 switch that I started to build. The rail just fits in the grooves so weight on the rails when soldering is very important. Some of the plates were cut because of the switch and frog rails. I will probabily not finish this switch because the lack of the appropriate switch tie plate details. I will be ordering some from the Proto 87 store during January.

John


Attachments:
Frog55TiePlates.jpg
Frog55TiePlates.jpg [ 169.54 KiB | Viewed 20011 times ]
Top
  
 
 Post subject:
PostPosted: Sat Jan 07, 2006 3:16 pm 
Offline

Joined: Mon May 24, 2004 6:02 pm
Posts: 63
Location: vestal, ny
john,
looks nice,
btw is that weathered rail?


Top
 Profile  
 
PostPosted: Fri Jan 13, 2006 3:57 pm 
Offline

Joined: Mon Aug 15, 2005 4:54 pm
Posts: 13
Hi Tim & Everyone,

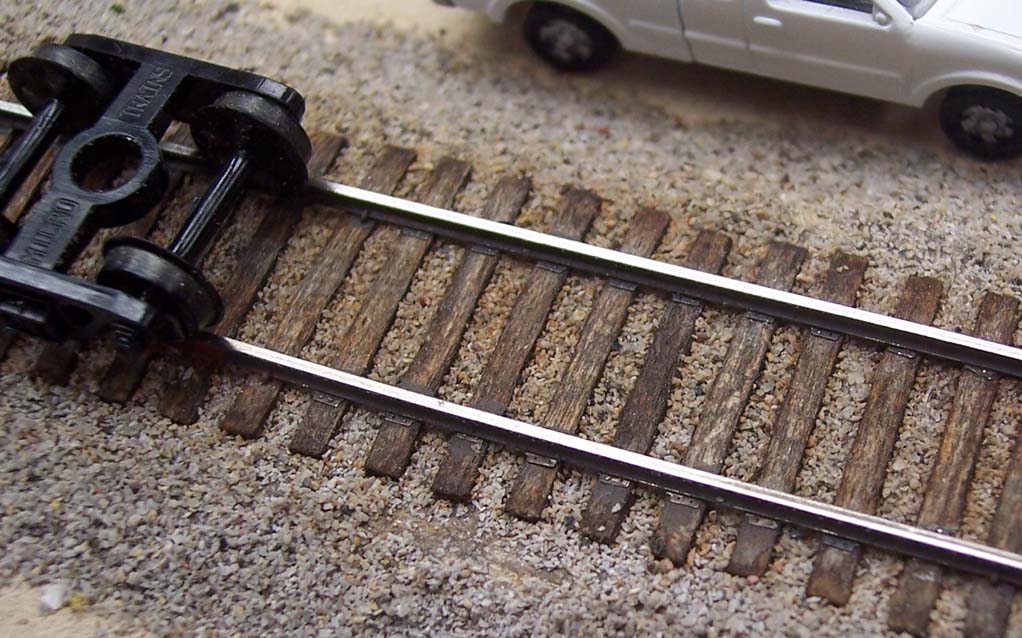
I've just completed a sample of some trackwork featuring the new Code 40 tieplates from the P:87 Stores; I'm attaching a .jpg image for you to look over.

I think that together with the Twist Ties this should yield some awesome looking track. One way to use these with the Pliobond method would be to trim the tieplates to remove the portion that normally sits underneath the rail, then just glue the tieplates into place at the base of the rail on either side. The really nice thing about the Twist Ties is that the laser-etched guide lines ought to make it much easier to get everything lined lined up & put together properly, without having to position the rail over a bunch of loose tieplates. The tieplates could even be retro-fitted to existing Twist Ties track.


Attachments:
100_0063-cropped2.jpg
100_0063-cropped2.jpg [ 163.19 KiB | Viewed 19945 times ]
Top
 Profile  
 
 Post subject:
PostPosted: Fri Jan 13, 2006 4:02 pm 
Offline

Joined: Mon Aug 15, 2005 4:54 pm
Posts: 13
Also I wanted to mention, no reason why the tieplates couldn't be put atop the PC board ties too, for anyone who wants soldered construction.


Top
 Profile  
 
 Post subject:
PostPosted: Sat Jan 14, 2006 10:42 pm 
Offline

Joined: Mon May 24, 2004 6:02 pm
Posts: 63
Location: vestal, ny
ed,
great looking track :)
must say the tie plates look great too.
what ties did you use?
i like the wood grain of them.
what about the ballast? WS? AR&M? highball?
btw is that a normal rail spike i see just in front of the wheels?
what did you use for the spikes? ME micro spikes?
also, whats the code for the rail?
thx


Top
 Profile  
 
 Post subject:
PostPosted: Tue Jan 17, 2006 8:32 pm 
Hi Sam,

Thanks for the kind words. The ties in the image are just plain Micro Engineering N-scale regular length ties, glued down to the roadbed with yellow carpenter's glue and sanded level (conventional technique). I think that Tim's Twist Ties would work better and faster for this, for several reasons:

- they are already together on a single strip -- just lay 'em right down.
- they have the laser-cut guide lines to make rail laying faster & more accurate. (Note in the image how the centerline of my rails is actually a bit off from the centerline of the ties... I always seem to have trouble with that.)
- little or no sanding required
- the M.E. ties tend to be a bit too irregular, both in length and in cross-section

The rail here is code 40 (note that the railhead is approx. 0.021" on that!) and the spikes that you see are the P:87 photo-etched spikes (made from stainless steel). These are actually a scale HO spike (1:87) and are about half the size of the smallest spikes that Micro Engineering makes. The ballast is AR&M #130-1 (IIRC), tho you can see that I rushed the ballasting part of the job, since there is a section of it that is nearly worn thru in the image.

BTW the roadbed here is just a strip of 1/8" birch plywood. Those small spikes seem to to a pretty good job of holding in that -- I think that if I tried to pull up the rail, I'd bend the rail before the spikes would let loose.


Top
  
 
 Post subject:
PostPosted: Tue Jan 24, 2006 2:06 pm 
Offline

Joined: Mon May 24, 2004 6:02 pm
Posts: 63
Location: vestal, ny
thx for the info ed.
btw from the pic, it looks like unweathered rail?
or is it weathered and you cleaned the tops?
the sides look dull and dark, so just asking.
btw do you have experience with me's weathered rail?
any recommendations/comments?
hmm, interesting on the photoetched spikes,
they look really good.
will have to look into getting some.


Top
 Profile  
 
 Post subject:
PostPosted: Tue Jan 24, 2006 4:20 pm 
Offline

Joined: Mon Aug 15, 2005 4:54 pm
Posts: 13
Hi Sam, actually I used weathered rail & cleaned off the railhead with fine-grit sandpaper (#600), then brush-painted it to match the tieplates. I cannot seem to come up with a paint color that is a close enough match to the weathering color, so in the future I will probably use nonweathered rail and just paint it the same color as the tieplates and spikes.

The photoetched spikes come in different lengths. The regular-length ones (which are the length of a 1:87 scale spike) are harder for me to handle so I like the elongated ones. A Xuron Tweezernose pliers is fine enough for driving these kinds of spikes. I don't use Homasote roadbed, but the birch veneer plywood seems to hold the spikes well and doesn't result in too many bent spikes (I had to develop a light touch) :)

I haven't tried pushing any spikes thru any of the tieplates yet tho... the holes in the tieplates are too small and would need to be enlarged with a #80 drill bit, but that would get tedious *very* quickly. A true 1:160 N-scale spike would probably be too small to be practical.

The spike technique (without tieplates) looks a lot like conventional hand-spiked Code 70 HO-scale track that is magically reduced 54% to N-scale. I think that the best bet for spiking is for modelers who don't care for gluing the rail down with Pliobond. The laser-cut guide lines on the Twist Ties should make the process pretty accurate as well as faster. (If you haven't guesed yet, I'm just itching to try out the Twist Ties when they become available) :D


Top
 Profile  
 
 Post subject:
PostPosted: Mon Feb 06, 2006 12:13 am 
Offline

Joined: Mon May 24, 2004 6:02 pm
Posts: 63
Location: vestal, ny
ed,
thats interesting.
any particular reason to clean the railhead smooth?
i remember someone posting somewhere to the effect..
"if you want to run your trains, then file off the rail heads or use unweathered rail..."
was wondering if maybe this is a problem with the weathered ME rail...
poor(er) conductivity? i thought that the weathering was also conductive, but maybe its not as good?
if so, i guess i may be looking into some (more) tedium...
the new spikes you used (proto87) are really nice, and i think i'm gonna try to get some and try them out :)
the tie plates though, i think i'll hold off for a little while...right now, i'm doing a bit of backwoods layout, and i think that would be overkill
one last thing....
should be getting an nmra gauge soon :)
so i'll be able to start laying rail soon.
though im still waiting for the twist ties to come out...
think that will really help make things easier.


Top
 Profile  
 
 Post subject:
PostPosted: Mon Feb 06, 2006 12:18 am 
Offline

Joined: Mon May 24, 2004 6:02 pm
Posts: 63
Location: vestal, ny
ed,
forgot to ask...
what stain did you use for the ties?
i havent been able to find me ties in stock anywhere for over a year or so...
so i ended up getting some scale lumber thats close enough (dimensionally), and plan to cut them to size.
but do you know if anyone has the me ties in stock?
are they basswood?


Top
 Profile  
 
 Post subject:
PostPosted: Mon Feb 06, 2006 1:00 pm 
Offline

Joined: Mon Aug 15, 2005 4:54 pm
Posts: 13
Hi Sam,

Are you a member of the Yahoo groups: handlaidtrack@yahoogroups.com and/or N_FineScale@yahoogroups.com? These have had discussions on cleaning railhead, you might want to join & check out the archives. I clean off the M.E. weathering even just for appearance, but I thought that it was also necessary for electrical contact -- I'll have to try some uncleaned, weathered track & see if that works or not.

I've tried cutting 1/16" square basswood & balsa for ties, tho the dimensions aren't quite right. 1/16" is 10" in N-scale - a bit too wide, but may be acceptable for some folks. The bigger issue for me is that it gets to be a bit time-consuming. I really like detailing, but I don't have as much time as I would like, so I am very interested in techniques like the Twist-Ties that save time & produce better results. (BTW the balsa won't hold the P:87 spikes too well, I'd be concerned about getting gauge variance over time with that combo.)

For staining I used artist's acrylics (blacks/grays/umbers) but I found that these tend to bleed later when I soak the ballast with alcohol. I may have to let them sit longer before applying the alcohol. Also I think I may try out those water-based oil colors & see how they work, tho I am concerned that they may take too long to dry. A light pass with a heat gun might help, I'll have to see. :)

Yes, regardless of technique you'll need the NMRA gauge, even for commercial flextrack & turnouts. I've had commercial turnouts that were defective -- the gauge would bind in the flangeways. Also for handlaying you might want to consider some of the Micro Engineering 3-point track gauges that Tim has (Part # 42-110).


Top
 Profile  
 
 Post subject:
PostPosted: Mon Feb 06, 2006 8:47 pm 
Offline

Joined: Mon May 24, 2004 6:02 pm
Posts: 63
Location: vestal, ny
ed,
i'm not a member of either group.
but have been contemplating the handlaidtrack group for a while now.
i think that was where i read the warning of cleaning the railhead...
didnt really know 'bout the n_finescale group, but thats really piqued my interest now.
are you a member of either/both?

the "lumber" i got for ties is walnut strips (i think).
it already comes a deep brown color,
so am a little unsure how to "weather" it.
may just leave it like that for now.
i've got two sizes...5x10, and 7.5x10 n-scale inches.
thought i might use the thicker wood for mainline,
and the thinner for backwoods lumber or mine (sans ballast).


Top
 Profile  
 
 Post subject:
PostPosted: Mon Feb 06, 2006 8:59 pm 
Offline

Joined: Mon Nov 14, 2005 8:50 pm
Posts: 73
Location: Cassville, MO
Sam - be aware that if what you have is really walnut strips you may have to predrill all spike holes. Walnut is very hard and small pieces tend to be brittle and split easily. I have worked with walnut for full sized furniture and always drill all fastener holes due to this.

Littletree


Top
 Profile  
 
 Post subject:
PostPosted: Mon Feb 06, 2006 10:30 pm 
Offline
User avatar

Joined: Sat Aug 13, 2005 10:48 am
Posts: 365
Location: East Texas - USA
N-gage folks,

The Kappler N Ties are excellent - check:

http://www.kapplerusa.com/y2k/p-n-ties.htm

Scale 7x9 and 4x9

_________________
-ed mccamey-
COSLAR RR - http://www.coslar.us/
NMRA Standards and Conformance Department
PROTO & FINE Scale Coordinator
I estimate I have about 5 pounds of coupler springs somewhere in the vicinity of my workbench.


Top
 Profile  
 
 Post subject:
PostPosted: Tue Feb 07, 2006 3:17 pm 
Offline

Joined: Mon May 24, 2004 6:02 pm
Posts: 63
Location: vestal, ny
emccamey,
thats where i saw the two different size (thickness) ties...
regular and low profile.
and so when i ordered the scale lumber, i got two sizes too...
figured that when i sand the ties level, they'd come out the right thickness.
i dont have any experience with either ME or kappler ties...
and have only seen pics of the ME ties from others efforts.
wish i could see how the kappler ties come out.
i remember someone (i think on the atlas forum) mentioning that there was a difference between the two.


Top
 Profile  
 
Display posts from previous:  Sort by  
Forum locked This topic is locked, you cannot edit posts or make further replies.  [ 33 posts ]  Go to page Previous  1, 2, 3  Next

All times are UTC - 5 hours [ DST ]


Who is online

Users browsing this forum: No registered users and 1 guest


You cannot post new topics in this forum
You cannot reply to topics in this forum
You cannot edit your posts in this forum
You cannot delete your posts in this forum
You cannot post attachments in this forum

Search for:
cron
Powered by phpBB® Forum Software © phpBB Group